Use of the main window
- Choose the file or directory to be documented
- The general tab
- The document tab
- The html tab
- The category tab
- The functions only tab
- The application tab
The main window allows you to run easily Cod2Doc on your source files. The interface permits to fully configure the behaviour of Cod2Doc. All the options are saved for the next session.
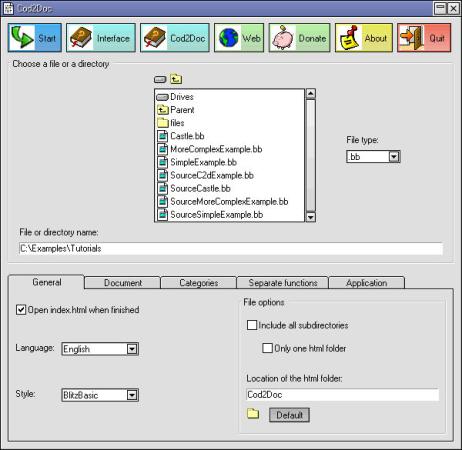
Choose the file or directory to be documented
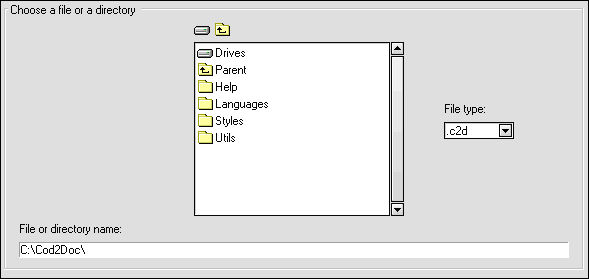
In this area, you can choose which file or directory you wish to document. If you select one file, then only this file will be documented. If you select one directory, then the entire directory will be documented. Depending on the file type you choose, all the .bb files or .c2d files located in the directory will be treated. You have also an option to include subdirectories of the chosen directory.
The general tab

|
Open browser when finished: This option allows you to open the html index file in a browser when Cod2Doc has finished the treatment. For normal use, the index file is called index.html. For functions in separate file mode, the index file is called indexFunctions.html. This file is written in the output directory defined below. Sometimes, there is no index.html file at all (.c2d files for example) or even several index.html files: in this cases the first file treated by Cod2Doc is opened. |
|
Language: You can choose the language that will be used inside the documentation. See the language chapter for more details. |
|
Style: You can choose the style of the documentation. The style defines the font, the background, the colour of tables: it is entirely customizable. The style file uses the cascading style sheets format (.css). For more details, please refer to the chapter describing style. |
|
Include all subdirectories: If you choose a directory to document, this option allows you to include all subdirectories. This means that all .bb files or .c2d files (depending on the file type chosen) will be recursively documented in the current directory and all its subdirectories. Notice that the directory containing the documentation files (Cod2Doc\ by default) is not treated by Cod2Doc ;) |
|
Only one html folder: If the previous option is set (meaning that several directories will be documented), then there is two possibilities concerning the directory created to store the documentation:
|
|
Location of the html folder: You can choose here what will be the location and the name of the directory created by Cod2Doc to store the documentation. By default, this directory is called Cod2Doc\ and is located in the directory you have documented. A button allows you to parse directories. You can specify either a relative path (for example Cod2Doc): the location of the output directory will then be relative to the documented directory. You can also specify an absolute path (for example C:\Blitz\GeneratedDoc\): all documentation created, whatever the directory is, will be placed in this absolute path. Notice that in this case, the previous option is automatically set. If the directory doesn't exist, then it will be created. You can also specify no directory: it will simply put files in the current directory. |
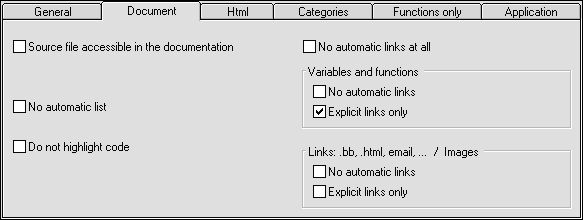
The document tab
|
Source file accessible: Select this option if you wish that the .bb source files are accessible from the documentation. In this case, a link will appear in the mini-index of the documentation. The source files are copied in the directory files/ in the documentation folder. |
|
No automatic list: This option allows to never insert automatically list. If this option is unchecked, a comment starting with the "- " or " * " characters will turn into a list. See this section for more details. |
|
Do not highlight code: If this option is set, portion of code inside code tags will not be highlighted (which accelerates the treatment). Otherwise the code is highlighted like in your preferred IDE. |
|
No automatic links at all: This option allows you to avoid all automatic links in your documentation. No automatic links will be possible (variables, functions, files, email, images). For more details about automatic links, see this chapter. |
|
No automatic links for variables and functions: This option allows you to avoid automatic links of variables and functions in your documentation. If this option is set, then no variables and no functions will turn into a link. For more details about automatic links, see this section. |
|
Explicit links for variables and functions: if this option is set, then only variables and functions which have their type specified are turned into link. See here for a detailed description of this option. |
|
No automatic links for files, email, images: This option allows you to avoid automatic links for files, email or images in your documentation. See this chapter for more details. |
|
Explicit links for files, email, images: if this option is set, then only files/email/images which contain brackets [] will turn into a link. For example file.html won't become a link whereas file.html[click here] will. |
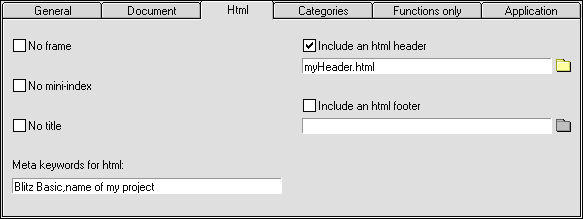
The html tab
|
No frame: This option allows you to choose a documentation with or without frames. In default mode, Cod2Doc uses a small frame at the top to display a mini-index with some links (index file, constant variables, functions, ...). If the option is set to no frame, the mini-index will still be displayed in the file (at the top and at the bottom of the file). To hide the mini-index, see next option. |
|
No mini-index: The mini-index is the line of links created by Cod2Doc and displayed in the documentation. This mini-index gives some links to the index file, to constant variables, to functions, etc... If you don't want the mini-index, check this option. Notice that if you choose to have no mini-index, of course you won't have frame also (see previous option). |
|
No title: If this option is set, then the title of the document (the name of the source file) won't be displayed on the document. Also, no section titles will be displayed for categories (if the layout is sorted by category). Of course, this option concerns only the titles placed automatically by Cod2Doc! This option is useful when you want to control the general title and titles of section within the inline documentation. Notice that there is never automatic titles in .c2d files so that this option is meaningless. |
|
Meta keywords for html: The words you enter in this field allows you to define the keywords which will be put in the header of the html files. This permits search engines like Google or Yahoo to reference easily your page. The keywords should be separated by the "," character (comma). All the files treated by Cod2Doc will inherit of these keywords. However, if a specific file has the ;htmlKeyword tag, then the priority will be given to this tag. |
|
Include an html header: Cod2Doc allows you to include an html header in all the documented files (to add text, images, links, etc. at the top of the documentation). Enter here the name of the file that will be used as the header (it could be any format). You could also browse a file with the browse icon. The path could be absolute or relative to the current directory. To have more detail on this functionnality, please refer to this section. |
|
Include an html footer: Cod2Doc allows you to include an html footer in all the documented files (to add text, images, links, etc. at the bottom of the documentation). Enter here the name of the file that will be used as the footer (it could be any format). You could also browse a file with the browse icon. The path could be absolute or relative to the current directory. To have more detail on this functionnality, please refer to this section. |
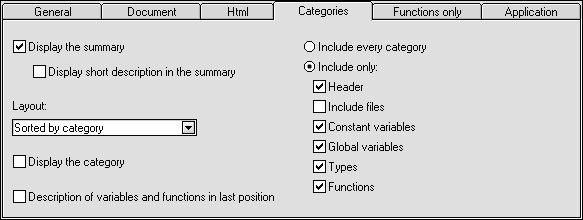
The category tab
|
Display the summary: With this option, you may display the summary of all keywords which are documented. The summary will be displayed at the top of the documentation, after the header. The summary is sorted similarly to the body of the documentation (see next option). Only the categories selected in this option are summarized. |
|
Display short description in the summary: If the previous option is set, this allows you to display one line of description for variables and functions in the summary. This line of description is taken from the first comment of the variable/function: only the first line of comment is displayed (if present). |
|
Layout: The layout specifies in which order is displayed the information contained in the original file. There is three main layouts defined in Cod2Doc:
|
|
Display the category: This option allows you to display on the right of a keyword (variable, function) the category to which it belongs. For example, for a function, the "Function" string will appears at the right of the table containing the function. This option is particularly useful when the document layout is set to "same order as the file" where categories are all mixed together. |
|
Description of variables and functions in last position: Every keyword (variable or function) has a description section (which is the main section in the documentation of the keyword, describing this keyword). This description could be placed before all other sections or after all other sections. For example, in the official command reference of Blitz Basic, the description comes in the last position, after the description of arguments of the command. |
|
Include categories: Cod2Doc let you decide which category you want to include in your documentation. You can include every category, or you can select a set of categories you want to include. Available categories are: header (general description of code + tags located before the first non commented line), include files, constant variables, global variables, types and functions. |
The functions only tab

|
Only functions in separate files: The default behaviour of Cod2Doc creates a documentation containing all the variables and functions. In addition to this, Cod2Doc allows you to mimic the command reference help files of Blitz Basic. With this option, you can create one html file per function. So, instead of having one html file for one .bb file, you will have as many html files that the numbers of functions contained in the .bb file. Only the functions are documented (inline documentation referring to this function is also taken into account): the other categories are not documented when this option is set. In this mode, an index of all functions documented is automatically created. This index is called indexFunctions.html and is located in the output directory. If several directories are documented (see this option), then all the functions will be referenced in the index. The layout of the documentation is quite different from the standard Cod2Doc documentation. This layout try to mimic the command reference presentation: the index of the function is located on the left of the window (if you use frames). The main html window (displayed on the right side) is a nearly empty window. This file is called main.html and can be found in the output directory. You may modify it to include your own text. Don't panic, Cod2Doc won't erase this file ;) |
|
Only one function: If you wish to document only one function in a .bb file, then you should check this option and fill the text input to specify the name of the function. |
|
Function index in alphabetical order: Check this option if you want to sort the function index in alphabetical order (only functions belonging to the same directory). If this option is unckecked, then the order of the functions in the index will be the one of the .bb file. |
|
Functions highlighted in the IDE + Quick help F1: Make your own functions behave like Blitz functions! This feature allows you to highlight your own functions in the IDE! In addition, pressing F1 in the IDE will display the quick help for your function (arguments and their type), pressing a second time F1 will display your html documentation in the IDE!! To have more details about this feature, please read this chapter. |
|
Userlib name: Enter here the name of the userlib that will contain your function. |
|
Functions are: Choose if your functions are either 2D commands or 3D commands. 3D commands would only work if you have Blitz 3D installed on your system. |
|
Blitz Path: Enter here the path where is installed Blitz Basic on your computer (for example: C:\Program Files\Blitz3D\). You can also open a window to browse folders. |
|
Delete userlib: Click here if you want to delete userlibs created previously by Cod2Doc. To have more details about this feature, please read this section. |
Delete userlib panel
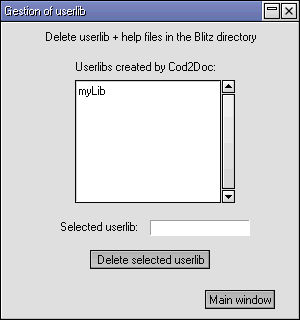
This panel allows you to delete userlib previously created by Cod2Doc (and only these!).
The list contains a list of all userlibs created by Cod2Doc. If you want to delete an userlib, just select it and press the "Delete selected userlib" button.
More details in this this section.
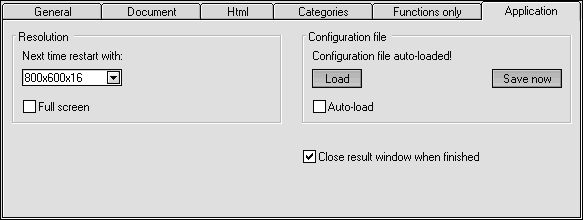
The application tab
|
Resolution: This option allows you to set the resolution of the application at the next restart, and whether it should run full screen or not. |
|
Configuration file: This group of options is useful for those who work on several projects using Cod2Doc (for example a code library and a web page). If these projects used a different set of options (style, layout, output directory), then this option is for you! Each time you push the "Start" button in the main window, a snapshot of the current configuration is saved in the current directory. Cod2Doc detects the presence of this snapshot and tells you that this configuration file was found. You have the possibility to load this configuration file to restore the previous configuration. |
|
Load configuration file: If a configuration file is present, then you can load this file and update all the options. |
|
Save configuration file: The configuration file is automatically saved each time you push the "Start" button. However, in some case, it could be useful to save yourself the configuration file (if you want to use the configuration file with a command line for example). |
|
Auto-load: If this option is checked, then Cod2Doc will automatically load the configuration (if present) each time you change the directory: the options are then automatically updated depending on the current directory! Really cool option ;) |
|
Close result window when finished: If this option is checked, then the result window will close itself after completion. However, if there is an error or a warning during the execution, the window is not closed in order for you to see the error. |
Drag and drop / Command line
Drag and drop
Cod2Doc has a full support for drag and drop!
There is 2 ways to use the drag and drop:
- drag a file or a directory on the Cod2Doc exe icon (you could drag several files or several
directories). Cod2Doc will open automatically and will document the dragged files/directories.
The options used for the documentation are the last one used, or, if the auto-load option is set, The configuration file used is the one located in the directory where are the documented files.
The browser is always opened after such an operation.
(notice that on windows 98, the short version (DOS) of file name is used)
- drag a file or a directory directly on the main window of Cod2Doc (only one file or one
directory at a time is supported). The dragged file or directory will be automatically documented, using
the current options.
Notice that if several instances of Cod2Doc are running at the same time, only the first instance will support this kind of drag and drop.
Command line
Cod2Doc could be called from windows/DOS with a command line (arguments given to Cod2Doc). The format is the following:
Cod2Doc.exe "Path1" "Path2" "Path3"
where path is either a file name (.bb or .c2d) or a directory name. You could specify as many path as wanted. The quotes are mandatory around the path. You may need to specify the path to the Cod2Doc executable (Cod2Doc.exe).
The options used for the documentation are the last one used, or, if the auto-load option is set, the configuration file used is the one located in the directory where are the documented files.
The browser is always opened after such an operation.
Here is an example:
Cod2Doc.exe "C:\My Documents\Blitz\myFile.bb" "C:\My Documents\Blitz\My Project\"
Interfacing Cod2Doc with an IDE
With the command line functionality, it's easy to interface Cod2Doc with an existing IDE (of course, it has to be done by the IDE developper!). So, if you are an IDE developper, why not add a Cod2Doc icon/menu to your IDE to increase its functionality? Clicking on this icon will for example document the current open file, or document the whole project. To call Cod2Doc from the IDE, just call it with a command line (see beginning of section), like this:
Cod2Doc.exe "Path1" "Path2" "Path3"
Of course, you should provide the possibility to specify in your IDE the path to Cod2Doc.
You could find the Cod2Doc icon in the Utils\ folder of Cod2Doc. If you have question for the implementation, feel free to contact me at repeatuntil@free.fr.
Looking forward to see some Cod2Doc functionality in an IDE!!
